The Art of Visible Mending: How Sashiko and Boro Transform Worn Garments into Lasting Heirlooms
Embracing the Beauty of Worn Threads
A frayed knee, a thinning cuff, or a small hole in a treasured sweater does not have to mark the end of a garment”s useful life. Visible mending takes the opposite approach to disposable fashion: instead of hiding damage or discarding the item, it makes repair part of the design. Carefully placed patches, deliberate lines of thread, and contrasting textures turn weakness into an intentional visual feature.
This attitude is closely related to the Japanese concept of mottainai, a feeling of regret over waste combined with respect for the value held in everyday objects. A well-loved pair of jeans can carry traces of movement, work, travel, and time. With thoughtful repair, humble denim, linen, cotton, and knitted fabric become more than functional clothing. They become personal textile records, shaped by the hands that preserve them and distinctive enough to serve as lasting heirlooms.
The Philosophy and Heritage of Boro and Sashiko
Boro and sashiko developed from conditions in which cloth was precious, labor-intensive, and difficult to replace. During Japan”s Edo period, from 1603 to 1868, strict social regulations limited what many working people could wear. Rural communities relied heavily on handwoven hemp, ramie, and later indigo-dyed cotton. When these fabrics wore thin, garments were not casually thrown away. They were patched, layered, re-cut, and passed through repeated cycles of use.
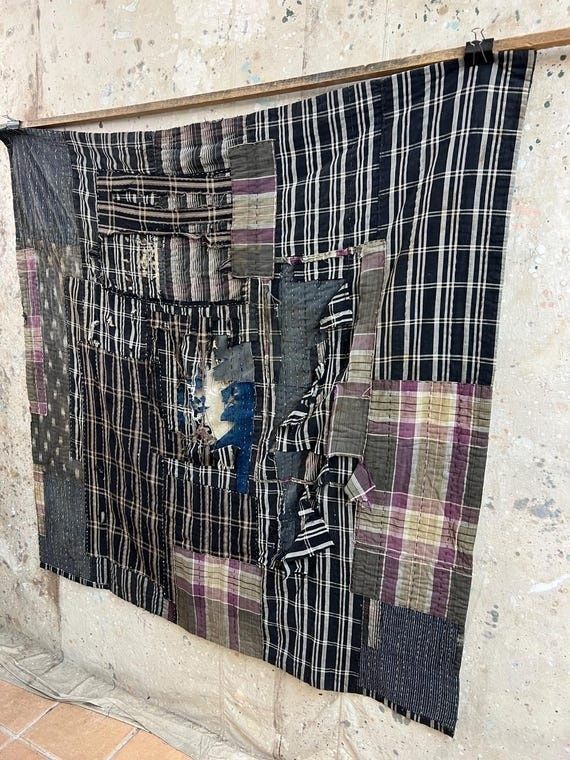
Boro describes the resulting practice of accumulated repair, usually involving overlapping pieces of cloth secured across worn areas. Its character comes from irregular layers, visible seams, varied fabric histories, and the gradual growth of a garment over time. Sashiko, whose name derives from the Japanese verb sasu, meaning “to pierce,” refers more specifically to the reinforcing running stitch. The name is often translated as “little stabs,” a precise description of the repeated punctures that hold cloth together.
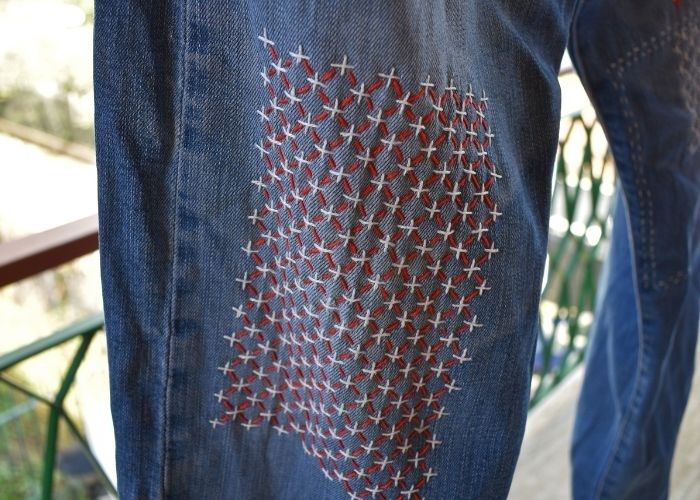
Traditional sashiko is strongly associated with white cotton thread on indigo fabric, although contemporary makers use many colors and materials. Geometric patterns such as diamonds, waves, checks, interlaced circles, fish scales, and nets could be decorative, symbolic, or protective. The two broad pattern families are often described as moyōzashi, in which long lines form motifs, and hitomezashi, which uses smaller, denser stitches to create a woven appearance. A useful overview of the technique”s historical and geometric traditions appears in this history of sashiko stitching.
For generations, these methods were associated with economic necessity and domestic skill rather than luxury. As inexpensive manufactured textiles became more accessible in the mid-twentieth century, their practical importance declined. Today, however, boro and sashiko are respected worldwide as textile arts. Their renewed appeal reflects interest in slow making, resistance to overproduction, and the calming rhythm of hand stitching. The modern maker can honor this heritage without copying hardship, using the techniques to care for existing clothing and to create designs with personal meaning.
Essential Materials and Toolkit Preparation
A successful repair begins with tools that suit the fabric rather than simply the prettiest thread. A sturdy sashiko needle is generally longer and more substantial than a standard embroidery needle, making it easier to load several running stitches before pulling the thread through. A palm thimble or thimble ring supports the back of the needle, while sharp embroidery scissors keep thread ends clean. Water-soluble pens, tailor”s chalk, or a removable dotted grid help transfer geometric designs without leaving permanent marks.
Traditional sashiko cotton has a matte surface and a substantial, slightly soft twist. Stranded embroidery floss offers a wider color range and can be divided for lighter repairs, but its strands may separate if pulled aggressively. Darning yarn or sock-reinforcing yarn is better suited to knitted garments and areas that need flexibility rather than crisp geometric definition. For wool sweaters, choose a compatible wool or a strong cotton thread with enough softness to avoid cutting through the knit. Prewash patch fabrics when possible, particularly if the finished garment will be laundered regularly.
| Repair situation | Recommended needle and patch | Thread guidance |
|---|---|---|
| Heavy denim knee or seat | Long, sturdy sashiko needle with a prewashed cotton or denim patch | Thick sashiko cotton or strong cotton thread |
| Lightweight woven shirt | Medium embroidery needle with a lightweight cotton or linen patch | Finer sashiko thread or divided embroidery floss |
| Loose knitted sweater | Blunt yarn needle and a flexible knitted or felted patch | Darning yarn, wool, or sturdy embroidery cotton |
| Small decorative reinforcement | Fine sashiko or embroidery needle with a discreet backing | One or two strands of floss for controlled detail |
Keep a darning egg, smooth spoon, or small rounded form available for curved repairs. These supports prevent the fabric from collapsing while you work. A contrasting thread can make the repair graphic and expressive, while a closely related shade produces a quieter, more integrated finish. The important choice is not whether the repair attracts attention, but whether the color, scale, and texture look deliberate.
Designing and Laying the Structural Patch
Begin by examining the damage from both sides. Look for thinning fabric beyond the obvious hole, loose yarns, stretched seams, and stress points that may fail next. Trim only unstable threads, never healthy fabric, and stabilize a long tear with temporary safety pins or loose basting before applying the permanent patch. If the edges are actively unraveling, a backing layer can distribute tension and prevent the stitches from pulling directly against the damaged area.
An underlay patch sits behind the garment, allowing the original fabric and the sashiko design to remain visible. This method is useful for holes in denim knees or elbows when a graphic, framed effect is wanted. An overlay patch sits on top and is especially practical when the damaged area needs substantial coverage. For severe wear, multiple layers can be combined, but avoid creating a stiff lump that restricts movement. Cut patches with rounded corners or softened angles, since sharp corners tend to lift first.
- Choose patches with compatible weight, weave, and laundering needs.
- Wash and dry reclaimed fabric before cutting so later shrinkage does not distort the repair.
- Arrange scraps by color and scale, balancing quiet neutrals with one or two stronger accents.
- Overlap edges slightly when building a boro-inspired composition, allowing each layer to remain visible.
- Pin or baste generously, especially around knees, elbows, and curved seams.
- Test the proposed arrangement on a flat surface before stitching directly onto the garment.
Boro does not require perfect matching. In fact, a convincing composition often includes differences in fade, weave, and age. The goal is visual harmony rather than uniformity. Historic museum collections can provide valuable ideas for proportion, layering, and stitch placement; the Victoria and Albert Museum”s guide to making a Japanese boro bag is a useful source of project inspiration. Keep the repair functional by placing patches so they follow the garment”s movement, and always baste before committing to dense decorative stitching.
Mastering the Sashiko Stitch Step by Step
Traditional sashiko depends on even running stitches, but consistency does not mean mechanical perfection. A steady rhythm and balanced tension matter more than identical measurements. On a flat woven area, mark a grid or motif with a water-soluble pen or tailor”s chalk. Test the markings on an inconspicuous section first, since some pens behave differently on dark denim, coated fabric, or wool.
- Prepare the thread. Cut a manageable length rather than an excessively long one, which can tangle and wear. Thread the needle without relying on a bulky knot when possible.
- Set the direction. Follow the chosen geometric pattern, beginning in a stable area and working toward the damaged section. Keep the marked lines visible as the design develops.
- Load several stitches. Using palm-thimble pressure, push the needle through the fabric and gather multiple running stitches on the shaft before pulling the needle through. This movement, often called unshin, creates the distinctive sashiko rhythm.
- Control the tension. Pull the thread until it rests against the surface, then stop. Do not draw the woven fibers taut, because excessive tension causes puckering and can weaken the garment around the repair.
- Cross and reinforce carefully. At intersections, keep the pattern orderly and avoid crowding. Dense hitomezashi-style work may require shorter stitches and more frequent checks from the reverse side.
- Finish discreetly. Secure the thread on the back with small woven-in passes or a restrained knot placed where it will not rub the skin. Trim only after the thread is firmly anchored.
On curved areas, such as a knee or elbow, work in shorter sections and rotate the garment rather than forcing the fabric to lie flat. If the patch begins to ripple, pause and release the last few stitches before continuing. A repair that looks slightly relaxed while being sewn will often settle into the garment better than one pulled drum-tight.
For comfort and durability, avoid stacking bulky knots beneath high-friction areas. Thread tails can be woven back through several existing stitches, then trimmed close to the surface. Turn the garment inside out repeatedly during the process to check that the patch remains smooth and that no sharp needle points or loose loops are left behind. The finished stitching should reinforce the fabric, not create a new source of irritation.
Wear Your Story with Pride
Visible mending changes the meaning of damage. Each line records a decision to keep, repair, and continue using something valuable. A patch may recall a favorite journey, a child”s growing years, a demanding job, or simply the satisfaction of learning a patient craft. Instead of pretending that wear never happened, sashiko and boro give it an intentional place in the design.
Care for repaired garments gently. Wash denim and woven pieces inside out on a cool cycle or by hand, use a mild detergent, and avoid high heat, which can shrink patches and stress stitched areas. Air-dry flat when practical, reshape knitted garments while damp, and inspect repairs periodically for loose edges. Begin with the garment waiting at the back of the closet, assess its weakest point, and give that first fray the time, structure, and character it deserves.